Whisks and blending attachments
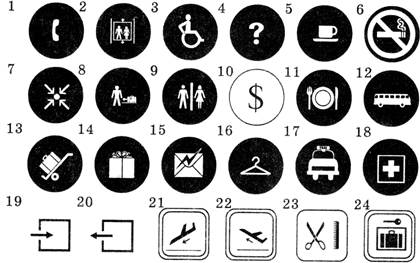
Signs
Air-port
Information/Inquiry- довідкове бюро
Passport control- паспортній контроль
Flight departure- відліт
Customs- митниця
Arrival- прибуття
Destination- місце призначення
Fasten safety belts- застібни ремінь
Flight- рейс
The railway station
Tickets- квитки
Left luggage- камера збереження речей
Station manager- начальник станції
Stuff only- тільки для працівників
Underground (subway) (метро)
Way out- вихід
Emergency exit- запасний вихід
No exit- виходу немає
No entry- вхід заборонено
Service entrance- службовий вхід
Pull- до себе
Push- від себе
Watch. Mind your head- Обережно. Бережіть голову.
Watch. Mind the step- Обережно. Сходинки.
In a train
Exit to next car - вихід до наступного вагону
Emergency use only - користуватись при небезпеці
Danger - небезпечно
Luggage/baggage - місце для багажу
Vacant - вільно
Engaged-зайнято
No smoking. Penalty $ 50 - Не палити. Штраф 50$
In the hotel
Receptionist- адміністратор
Conference room- конференц зал
W.C.- туалет
Underground car pack- підземна стоянка
Swimming pool- басейн
Travel agency- туристична агенція
Restaurant- ресторан
Please, do not disturb.- будь ласка не хвилювати
Taken/reserved- зайнято, заброньовано
Admission free- вхід вільний
In the street
Mailbox/postbox- поштова скринька
Stop. Don’t walk- Стій.
Walk- Йди
No swimming – Купатись заборонено
No photographing- Фотографувати заборонено
Private property- приватна власність
No parking- стоянка забороне
Task 2. Combine the words from the column A with the words from the column B:
A
1) Conference
2) Left
3) Fasten safety
4) Passport
5) Admission
6) Flight
7) Private
8) Emergency
9) Travel
10)Station
B
a) agency
b) property
c) manager
d) departures
e) exit
f) belts
g) room
h) free
i) luggage
j) control
Task 3. Translate the signs and learn them
EXIT
ENTRANCE
ELEVATOR
POST OFFICE
INFORMATION
NO SMOKING
EXCHANGE
TAXI
BAGGAGE CLAIM
CAFE
BUS
TELEPHONE
SOUVENIRS
RESTAURANT
HAIRDRESSER
DEPARTURES
LUGGAGE LOCKERS
FIRST AID
MEETING POINT
ARRIVAL
RESTROOM
PORTERS
CHECK ROOM
FACILITY FOR THE DISABLED
Завдання для самоконтролю
Перекладіть речення українською мовою:
1.Please show tickets.
2.Do not lean out of the window when the train is moving.
3.Adjust temperature before showering.
4.Service entrance is only for stuff usage.
5.You can leave the key and order at the receptionist.
6.To be used only in event of fire.
7.Please, close the door on leaving
Рекомендована література:
1. Карп'юк О. Д. English study. Підручник з англійської мови для IX класу шкіл з поглибленим вивченням англійської мови, гімназій, ліцеїв, коледжів. – 2 вид., випр. та перероб. – Тернопіль: Видавництво Карп'юка, 2005
Дидактичне забезпечення:словники, картки.
САМОСТІЙНА РОБОТА № 6
Тема: Технічний переклад інструкцій з використання електроприладів
Завдання до самостійної роботи :
I. Записати словник незнайомих слів. Заповнити колонку «Транскрипція». Вивчити слова напам`ять.
II. Прочитати надані інструкції з експлуатації електроприладів.
III. Доповнити словник незнайомих слів. Вивчити слова напам`ять.
IV. Вибрати одну інструкцію, перекласти її.
V. Знайти в інструкціях інформацію про електробезпеку при використанні побутової техніки. Перекласти її.
1.Словник незнайомих слів
| Слово | Транскрипція | Переклад |
| Electric safety | електробезпека | |
| device | пристрій | |
| circumstances | обставини | |
| to fill in | заповнювати | |
| to switch on /off | увімкнути / вимкнути | |
| to turn on /off | увімкнути / вимкнути | |
| level | рівень | |
| to disconnect | роз`єднувати | |
| to cover | покривати | |
| plug | вилка | |
| to dislodge | зсувати | |
| power | потужність | |
| guidance | інструкція | |
| electrical hazard | ураження електричним струмом | |
| o supply | постачати | |
| to recharge | перезаряджати | |
| to adjust | налагоджувати | |
| capacity | ємність | |
| to replace the bulb | міняти лампу | |
| tube | трубка | |
| automatically | автоматоматично | |
| knob(button) | кнопка | |
| accessory | аксесуари | |
| weight | вага | |
| to mix | змішувати | |
| description | опис | |
| speed | швидкість | |
| caution | застереження | |
| to boil | кип`ятити |
2.Інструкції з використання електроприладів:
І. TOASTER
Important Safeguards
1. Bread may burn, Therefore toasters must not be used near or below curtains and other combustible materials. They must be watched.
2. If the power cord or plug is damaged, be sure to stop using it at once, send it to nearby appointed repair center that authorized by manufacturer.
3. Householder use only. Do not use outdoors.
4. Do not touch hot surfaces if the toaster operating.
5. Do not immerse power cord, plug or appliance in water or other liquid
6. Do not place on or near a hot gas or electric burner or in a heated oven.
7. Trusting lever must be in the "UP" position before attaching or disconnecting the plug from wall outlet.
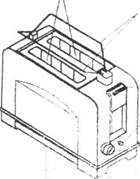 8 . Oversize foods, metal full packages, or Utensils must not be inserted in a toaster as they may involve a risk of fire or electric shock.
9. A fire may occur if toaster is covered or touching flammable material, including curtains, draperies, walls, when it in operation.
10. Do not attempt to dislodge food when toaster is operating.
Introduction
Make sure the main power is suited to use by the toaster.
Select the setting of your choice from the possible browning levels. The degree of browning increases in relation to the numbers on the select dial. For your guidance. The relationship between the levels and the type of bread is as follow. (LEVEL Type of bread "-"-1-2 Thin bread 3-4-5 Ordinary bread 6-7-"+" Frozen bread
3. Place the bread in the toaster and push the lever down until it automatically locks into place, the indicator will light
4. The toast is automatically released when the previously selected browning levels reached if you want to interrupt the lasting process at any time, just push the "STOP" button and the lever button will be back its original position.
LODGE HANDLE
STOP BUTTON
8ROWNING CONTROL
Cleaning Your Toaster
1. Before clean toaster, Please unplug the power cord from main outlet
2. Clean the surface of the toaster with a dry sponge or a dry soft rag,
Clean the bread crumb, please open crumb tray in bottom of toaster.
ІІ. MIXER
 Schematic:
A Mode control switch
В Attachment fixation button
C Turbo mode button
D Housing
E Whisks
F Blending attachments
G Blender attachment
When using electrical devices, observe the following safety rules:
1.Read the instructions.
2.Before turning on the mixer, make sure that the voltage and frequency of your power grid matches that of the unit.
3.To avoid electric shock, never dip the housing in water. If it accidentally falls into water, unplug it, wipe it dry and take it to a professional repairer of home appliances.
4.Do not leave a working mixer unattended near children.
5.Unplug the unit from the power outlet when you are not using it and before cleaning it.
6.Do not touch the attachments with your hands while the mixer is being used.
7.Before using the unit, make sure that the attachments are firmly fastened.
8.After you are finished, make sure that the mixer is switched off and unplug it.
9.Do not use a mixer with a damaged cord. Take a damaged mixer to a qualified specialist to examine and repair.
10.Use only the items that are included in the set.
11.Do not use the mixer out-of-doors.
12.Make sure that the cord does not catch on the corner of the table or touch any hot surface.
13.Before using, make sure that the mixer is completely assembled.
14.After using the mixer, unplug the attachments.
Before using the unit for the first time, wash all of the accessories thoroughly under running water!
Usage instructions
Whisks and blending attachments
1. Insert the whisks or blending attachments in the housing until they snap into place (drawing 1). When fastening the attachments, observe the marking on the mixer.
2. Plug the mixer into a power outlet.
3. Place products for blending/whipping in the appropriate container.
4. Lower the attachments into the mixing container and turn on the mixer by turning the switch to the right (drawing 2).
5. Set the desired speed (positions 1 - 5) - (drawing 2).
6. For turning on the "Turbo"-mode put the switch "A" to the left end position ("Blender"-mark) and push the "Turbo"-button (C).
7. After you are finished, set the speed control to "0" position.
8. Unplug the mixer.
9. To release the attachments, press on the attachment fixation button (drawing 4).
Blender
1.Fasten the blender attachment to the housing by turning it clockwise (drawing 5).
2.The mixing container must be not more than 2/3 full to prevent splashing. The height of the mixing container must be about 18 cm and the diameter must be about 11 cm.
3.The contents of the container must at least cover the main blender attachment.
4. Do not submerge or remove the blender from the mixing container while the motor is switched on.
5.For starting the operation put the switch "A" to the left end position ("Blender"-mark) and push the "Turbo"-button (C).
6.For your safety, the mixer has a sensor that prevents it from being used if the blender attachments are not fastened.
7.Hold the turbo mode button during use. The mixer will turn off when you release the turbo mode button.
ATTENTION:
1. Turn off the mixer after every 5 minutes of uninterrupted use.
2. Do not allow the mixer to remain working for more than 10 min at a time.
3. While using the blender, do not turn it on for more than 5 minutes. After use, submerge the attachment (but not the blender itself!) in water or other liquid.
Before removing the blender attachment from the housing, make sure that the speed control switch is in the "0" position.